Note: This post was written in 2015. The tutorial linked below runs on an expired version of Terraform and is no longer up-to-date. You can find a relevant and working blog post on the configuration here, and its github repository here. It uses a cloud.ca plugin rather than the CloudStack one.
Today, thanks to the cloud, all the computing resources you need are just a few API calls away. A whole infrastructure can be created and modified this way. Then, to treat infrastructure as code, you just need a tool that translates a plain text description of your infrastructure into a sequence of those API calls. That's what Terraform does. In this post, we will see how it is possible to treat infrastructure as code with the use of Terraform and cloud.ca.
Create a basic configuration
We can start with a very simple configuration: a virtual private cloud (VPC) containing one network with one virtual machine (VM) attached to this network. A VPC is a dedicated cloud space for your project. VPCs do not have access to one another and are a clean way to separate unrelated projects. In CloudStack terminology, a network is called a tier. We can apply an Access Control List (ACL) to a network to restrict inbound and outbound traffic to specific addresses, protocols and ports. That being said, let’s start writing our configuration. In order to do that, clone the repository: https://github.com/vilisseranen/terraform_cloudca ($ git clone https://github.com/vilisseranen/terraform_cloudca.git) and move to the tag "step1" ($ git checkout step1).
First step: we need to configure the provider. It is the part that tells Terraform how to make the calls and what API keys to use. The information about the CloudStack provider can be found here: https://terraform.io/docs/providers/cloudstack/index.html. Open cloudstack.tf.
provider "cloudstack" {
    api_url = "${var.api_url}"
    api_key = "${var.api_key}"
    secret_key = "${var.secret_key}"
}
Terraform allows for a configuration to be split across several files. These files are concatenated when the configuration is applied. You see here that the value mapped to each key is in the form ${var.name}. Terraform is able to associate variables defined in a special file (named terraform.tfvars) with their reference: ${var.name}. This way, you can keep all projects separate or keep sensitive data in another file which will not be versioned. We have to perform one more step to use variables in our configuration: declare them. We will do that in variables.tf. Open the file.
variable "api_key" {}
variable "secret_key" {}
variable "project" {}

variable "api_url" {
    default = "https://compute-east.cloud.ca/client/api"
}
variable "zone" {
    default = "QC-1"
}
variable "vpc_offering" {
    default = "Default VPC offering"
}
variable "disk_offering" {
    default = "20GB - 100 IOPS Min."
}
variable "compute_offering" {
    default = "2vCPU.2GB"
}
variable "network_offering" {
    default = "DefaultIsolatedNetworkOfferingForVpcNetworks"
}
variable "compute_template" {
    default = "CoreOS Stable"
}
This file declares every variable that will be usable in the configuration. You can see that some of them contain the key "default" which sets them to a default value that works on cloud.ca. These can then be overridden in the file terraform.tfvars. If you open this file, you will find values for the variables api_key, secret_key and project. This information can be found on cloud.ca in the upper right corner of the page when you are logged in. Click on API keys, select the service Compute East and the environment you want to use.
# cloudstack provider
api_key = "YOUR_API_KEY"
secret_key = "YOUR_SECRET_KEY"

# project
project = "YOUR_PROJECT"
We now have everything we need to connect to cloud.ca. Let's configure some resources. Open main.tf.
resource "cloudstack_vpc" "my_own_private_cloud" {
    name = "my_own_private_cloud"
    cidr = "10.10.0.0/22"
    vpc_offering = "${var.vpc_offering}"
    zone = "${var.zone}"
    project = "${var.project}"
}

resource "cloudstack_network_acl" "acl_web" {
    name = "acl_web"
    vpc = "${cloudstack_vpc.my_own_private_cloud.id}"
}

resource "cloudstack_network_acl_rule" "acl_web_tier" {
  aclid = "${cloudstack_network_acl.acl_web.id}"

  rule {
    action = "allow"
    source_cidr = "0.0.0.0/0"
    protocol = "all"
    traffic_type = "egress"
  }
  rule {
    action = "allow"
    source_cidr = "0.0.0.0/0"
    protocol = "all"
    traffic_type = "ingress"
  }
}
This file defines a VPC and an ACL that will be applied on a network. In web_tier.tf, we create the network (which uses the ACL of the previous file), an instance called wordpress01 and an IP address with a port forwarding rule.
resource "cloudstack_network" "web_tier" {
    name = "web_tier"
    cidr = "10.10.1.0/24"
    network_offering = "${var.network_offering}"
    vpc = "${cloudstack_vpc.my_own_private_cloud.id}"
    zone = "${var.zone}"
    aclid = "${cloudstack_network_acl.acl_web.id}"
    project = "${var.project}"
}

resource "cloudstack_instance" "wordpress01" {
    name = "wordpress01"
    service_offering= "${var.compute_offering}"
    network = "${cloudstack_network.web_tier.id}"
    ipaddress = "10.10.1.10"
    template = "${var.compute_template}"
    zone = "${var.zone}"
    project = "${var.project}"
    user_data = "${file(\"cloudinit_wordpress\")}"
}

resource "cloudstack_ipaddress" "wordpress01" {
    vpc = "${cloudstack_vpc.my_own_private_cloud.id}"
    project = "${var.project}"
}

resource "cloudstack_port_forward" "wordpress01" {
  ipaddress = "${cloudstack_ipaddress.wordpress01.id}"

  forward {
    protocol = "tcp"
    private_port = 22
    public_port = 22
    virtual_machine = "${cloudstack_instance.wordpress01.id}"
  }
}

output "wordpress01" {
    value = "${cloudstack_ipaddress.wordpress01.ipaddress}"
}
With the port forwarding rule on port 22 and the ACL set to allow all incoming connections, we just need to provide a SSH key to be able to connect to the machine remotely. This part is done in the file cloudinit_wordpress which is provided to the VM as the user data to configure the instance when booting. cloudinit_wordpress contains a directive which adds the SSH key to the core user. The SSH key provided in the file corresponds to the file core.pub which is also in the repository.
#cloud-config

ssh_authorized_keys:
    - ssh-rsa AAAAB3NzaC1yc2EAAAADAQABAAABAQDPn/jt5vTyRNpvpg/Eze+HOuOBXh1ygpqfadpUgcHfNMLslU+Tvr4WFvx/mCmMxJ6HyFCyGZ8gSsbKgRYAi8x/DD1/VI7Zj/c1b9oYhwL/zucQwCDubiKxtS1JEqOcF19tYeuJtYl/HcsdtnQ3cdu4wtTM6ZNowvM27G7PKvX1o0D/M1jfIh1Cibc8oxmoDl0Il+MUm9s6JtxDLnhI7SDwXtBPWe6zqORw9BCCDIHhaIzI6qITpdf4hhc3fhMN6bWh/ExuFbNRMNK4e3SZMN9sSgEGPvYvbUb2/Z09bTk7R9HCEz9u637p7aB6UHlJyOJWOZT7pXpLOjWi89vGUOn/ vilisseranen@pegasus
Our first configuration is now complete. In the folder containing a configuration, Terraform provides a few tools:
$ terraform planwill display the changes that will be done to the environment$ terraform refreshwill refresh the state according to what’s been created by Terraform$ terraform applywill apply the configuration. At this point resources will actually be created.$ terraform destroywill destroy resources created by Terraform (and only those)
Try $terraform plan to see what’s going to be created in your environment. If you like what you see, make it real with $terraform apply. Once the environment is deployed, you can connect with SSH using ssh -i core@PUBLIC_IP. Use the private key: https://raw.githubusercontent.com/vilisseranen/terraform_cloudca/master/core to connect to the VM.
You can also check the dependency graph Terraform creates for you with $ terraform graph | dot -Tpng > graph.png. Check the image, and you will see that Terraform is smart enough to determine the right order in which your resources must be created.
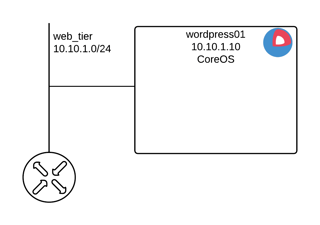
The environment we just created looks like this. The VPC is made of a virtual router with one network (web_tier) with subnet 10.10.1.0/24. One VM is attached to this network and holds the IP 10.10.1.10. The public IP (not represented on this diagram) goes from the router and redirects the port 22 to the VM.

Multi-tier application
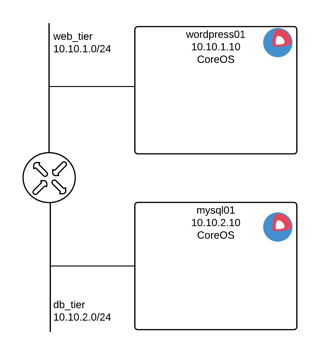
Let’s try to create a more complex environment. We are going to add another tier with a VM in it. As you might have guessed, the first VM in the web tier will host a webserver with Wordpress, and the second VM we will create will have the data base (DB) tier.
With git, move to tag "step2" (git checkout step2).
If you open the file main.tf, you will see that a new ACL has been created allowing all inbound and outbound connections. It would have been possible to reuse the ACL we previously created, but as we are going to set different ACL rules for each tier, we can declare an other resource which we will modify later.
resource "cloudstack_vpc" "my_own_private_cloud" {
    name = "my_own_private_cloud"
    cidr = "10.10.0.0/22"
    vpc_offering = "${var.vpc_offering}"
    zone = "${var.zone}"
    project = "${var.project}"
}

resource "cloudstack_network_acl" "acl_web" {
    name = "acl_web"
    vpc = "${cloudstack_vpc.my_own_private_cloud.id}"
}

resource "cloudstack_network_acl_rule" "acl_web_tier" {
  aclid = "${cloudstack_network_acl.acl_web.id}"

  rule {
    action = "allow"
    source_cidr = "0.0.0.0/0"
    protocol = "all"
    traffic_type = "egress"
  }
  rule {
    action = "allow"
    source_cidr = "0.0.0.0/0"
    protocol = "all"
    traffic_type = "ingress"
  }
}

resource "cloudstack_network_acl" "acl_db" {
    name = "acl_db"
    vpc = "${cloudstack_vpc.my_own_private_cloud.id}"
}

resource "cloudstack_network_acl_rule" "acl_db_tier" {
  aclid = "${cloudstack_network_acl.acl_db.id}"


  rule {
    action = "allow"
    source_cidr = "0.0.0.0/0"
    protocol = "all"
    traffic_type = "egress"
  }
  rule {
    action = "allow"
    source_cidr = "0.0.0.0/0"
    protocol = "all"
    traffic_type = "ingress"
  }
}
A new file has been created: db_tier.tf. This file declares a new tier (network 10.10.2.0/24) and a VM.
resource "cloudstack_network" "db_tier" {
    name = "db_tier"
    cidr = "10.10.2.0/24"
    network_offering = "${var.network_offering}"
    vpc = "${cloudstack_vpc.my_own_private_cloud.id}"
    zone = "${var.zone}"
    aclid = "${cloudstack_network_acl.acl_db.id}"
    project = "${var.project}"
}

resource "cloudstack_instance" "mysql01" {
    name = "mysql01"
    service_offering= "${var.compute_offering}"
    network = "${cloudstack_network.db_tier.id}"
    ipaddress = "10.10.2.10"
    template = "${var.compute_template}"
    zone = "${var.zone}"
    project = "${var.project}"
    user_data = "${file(\"cloudinit_db\")}"
}

resource "cloudstack_ipaddress" "mysql01" {
    vpc = "${cloudstack_vpc.my_own_private_cloud.id}"
    project = "${var.project}"
}

resource "cloudstack_port_forward" "mysql01" {
  ipaddress = "${cloudstack_ipaddress.mysql01.id}"

  forward {
    protocol = "tcp"
    private_port = 22
    public_port = 22
    virtual_machine = "${cloudstack_instance.mysql01.id}"
  }
}

output "mysql01" {
    value = "${cloudstack_ipaddress.mysql01.ipaddress}"
}
This VM has its own cloudinit file (cloudinit_db). For now, this cloudinit configuration just adds the SSH key (again, it would have been possible to reuse the same cloudinit file we used for the VM wordpress01, but we chose to create a new one for the same reasons as for the ACL above).
#cloud-config

ssh_authorized_keys:
    - ssh-rsa AAAAB3NzaC1yc2EAAAADAQABAAABAQDPn/jt5vTyRNpvpg/Eze+HOuOBXh1ygpqfadpUgcHfNMLslU+Tvr4WFvx/mCmMxJ6HyFCyGZ8gSsbKgRYAi8x/DD1/VI7Zj/c1b9oYhwL/zucQwCDubiKxtS1JEqOcF19tYeuJtYl/HcsdtnQ3cdu4wtTM6ZNowvM27G7PKvX1o0D/M1jfIh1Cibc8oxmoDl0Il+MUm9s6JtxDLnhI7SDwXtBPWe6zqORw9BCCDIHhaIzI6qITpdf4hhc3fhMN6bWh/ExuFbNRMNK4e3SZMN9sSgEGPvYvbUb2/Z09bTk7R9HCEz9u637p7aB6UHlJyOJWOZT7pXpLOjWi89vGUOn/ vilisseranen@pegasus
Application deployment
The last step for this guide is to deploy the application on the VMs. We will:
- Deploy Wordpress in a container on the VM in the web tier
- Deploy MySQL in a container on the VM in the DB tier
- Change public IPs port forwarding rules
- Put in place adequate ACL
With git, move to tag "step3" (git checkout step3).
Let's start with the Wordpress container. The only change is in the cloudinit configuration. Open the file cloudinit_wordpress.
#cloud-config

coreos:
  units:
    - name: "docker-wordpress.service"
      command: "start"
      content: |
        [Unit]
          Description=Wordpress
          After=docker.service
          Requires=docker.service

          [Service]
          TimeoutStartSec=0
          ExecStartPre=-/usr/bin/docker kill wordpress
          ExecStartPre=-/usr/bin/docker rm wordpress
          ExecStartPre=/usr/bin/docker pull wordpress
          ExecStart=/usr/bin/docker run --name wordpress01 -p 80:80 -p 443:443 -e WORDPRESS_DB_HOST=10.10.2.10 -e WORDPRESS_DB_USER=wordpress -e WORDPRESS_DB_PASSWORD=myWordpressPassword wordpress
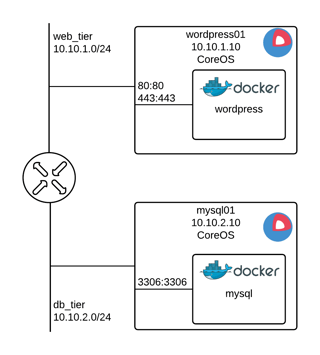
You will see that the SSH key has been removed (we will therefore be unable to log in to the machine) and the configuration to deploy Wordpress has been added (you can find information about how to do that on https://coreos.com/os/docs/latest/cloud-config.html and validate your YAML file on https://coreos.com/validate/). Note that we expose ports 80 and 443 from the container to enable access to it. We do the same thing with the file cloudinit_db except this time we deploy a MySQL container and expose port 3306.
#cloud-config

coreos:
  units:
    - name: "docker-mysql.service"
      command: "start"
      content: |
        [Unit]
          Description=MySQL
          After=docker.service
          Requires=docker.service

          [Service]
          TimeoutStartSec=0
          ExecStartPre=-/usr/bin/docker kill mysql
          ExecStartPre=-/usr/bin/docker rm mysql
          ExecStartPre=/usr/bin/docker pull mysql
          ExecStart=/usr/bin/docker run --name mysql -p 3306:3306 -e MYSQL_USER=wordpress -e MYSQL_PASSWORD=myWordpressPassword -e MYSQL_DATABASE=wordpress -e MYSQL_ROOT_PASSWORD=aStrongRootPassword mysql
In the file web_tier.tf, we modify the port forwarding rule to disable the port 22 redirection and enable the ports 80 and 443 redirection to our Wordpress machine.
resource "cloudstack_network" "web_tier" {
    name = "web_tier"
    cidr = "10.10.1.0/24"
    network_offering = "${var.network_offering}"
    vpc = "${cloudstack_vpc.my_own_private_cloud.id}"
    zone = "${var.zone}"
    aclid = "${cloudstack_network_acl.acl_web.id}"
    project = "${var.project}"
}

resource "cloudstack_instance" "wordpress01" {
    name = "wordpress01"
    service_offering= "${var.compute_offering}"
    network = "${cloudstack_network.web_tier.id}"
    ipaddress = "10.10.1.10"
    template = "${var.compute_template}"
    zone = "${var.zone}"
    project = "${var.project}"
    user_data = "${file(\"cloudinit_wordpress\")}"
    depends_on = [ "cloudstack_instance.mysql01" ]
}

resource "cloudstack_ipaddress" "wordpress01" {
    vpc = "${cloudstack_vpc.my_own_private_cloud.id}"
    project = "${var.project}"
}

resource "cloudstack_port_forward" "wordpress01" {
  ipaddress = "${cloudstack_ipaddress.wordpress01.id}"

  forward {
    protocol = "tcp"
    private_port = 80
    public_port = 80
    virtual_machine = "${cloudstack_instance.wordpress01.id}"
  }
  forward {
    protocol = "tcp"
    private_port = 443
    public_port = 443
    virtual_machine = "${cloudstack_instance.wordpress01.id}"
  }
}

output "wordpress01" {
    value = "${cloudstack_ipaddress.wordpress01.ipaddress}"
}
In db_tier.tf, we remove the public IP as this machine should not be publicly accessible.
resource "cloudstack_network" "db_tier" {
    name = "db_tier"
    cidr = "10.10.2.0/24"
    network_offering = "${var.network_offering}"
    vpc = "${cloudstack_vpc.my_own_private_cloud.id}"
    zone = "${var.zone}"
    aclid = "${cloudstack_network_acl.acl_db.id}"
    project = "${var.project}"
}

resource "cloudstack_instance" "mysql01" {
    name = "mysql01"
    service_offering= "${var.compute_offering}"
    network = "${cloudstack_network.db_tier.id}"
    ipaddress = "10.10.2.10"
    template = "${var.compute_template}"
    zone = "${var.zone}"
    project = "${var.project}"
    user_data = "${file(\"cloudinit_db\")}"
}
To see changes that occurred to the ACLs, open main.tf.
resource "cloudstack_vpc" "my_own_private_cloud" {
    name = "my_own_private_cloud"
    cidr = "10.10.0.0/22"
    vpc_offering = "${var.vpc_offering}"
    zone = "${var.zone}"
    project = "${var.project}"
}

resource "cloudstack_network_acl" "acl_web" {
    name = "acl_web"
    vpc = "${cloudstack_vpc.my_own_private_cloud.id}"
}

resource "cloudstack_network_acl_rule" "acl_web_tier" {
  aclid = "${cloudstack_network_acl.acl_web.id}"

  rule {
    action = "allow"
    source_cidr = "0.0.0.0/0"
    protocol = "tcp"
    ports = [ "53", "80", "123", "443" ]
    traffic_type = "egress"
  }
  rule {
    action = "allow"
    source_cidr = "0.0.0.0/0"
    protocol = "udp"
    ports = [ "53", "123" ]
    traffic_type = "egress"
  }
  rule {
    action = "allow"
    source_cidr = "${cloudstack_instance.mysql01.ipaddress}/32"
    protocol = "tcp"
    ports = [ "3306" ]
    traffic_type = "egress"
  }
  rule {
    action = "allow"
    source_cidr = "0.0.0.0/0"
    protocol = "icmp"
    traffic_type = "egress"
  }
  rule {
    action = "allow"
    source_cidr = "0.0.0.0/0"
    protocol = "tcp"
    ports = [ "80", "443" ]
    traffic_type = "ingress"
  }
  rule {
    action = "allow"
    source_cidr = "0.0.0.0/0"
    protocol = "icmp"
    traffic_type = "ingress"
  }
}

resource "cloudstack_network_acl" "acl_db" {
    name = "acl_db"
    vpc = "${cloudstack_vpc.my_own_private_cloud.id}"
}

resource "cloudstack_network_acl_rule" "acl_db_tier" {
  aclid = "${cloudstack_network_acl.acl_db.id}"

  rule {
    action = "allow"
    source_cidr = "0.0.0.0/0"
    protocol = "tcp"
    ports = [ "53", "80", "123", "443" ]
    traffic_type = "egress"
  }
  rule {
    action = "allow"
    source_cidr = "0.0.0.0/0"
    protocol = "udp"
    ports = [ "53", "123" ]
    traffic_type = "egress"
  }
  rule {
    action = "allow"
    source_cidr = "${cloudstack_instance.wordpress01.ipaddress}/32"
    protocol = "tcp"
    ports = [ "3306" ]
    traffic_type = "ingress"
  }
  rule {
    action = "allow"
    source_cidr = "0.0.0.0/0"
    protocol = "icmp"
    traffic_type = "egress"
  }
  rule {
    action = "allow"
    source_cidr = "0.0.0.0/0"
    protocol = "icmp"
    traffic_type = "ingress"
  }
}
In the previous steps, we used rules to allow all inbound and outbound connections which are not secure. We are going to allow outbound connections for DNS, NTP and ICMP and allow inbound connections for ICMP for both tiers. In addition, we added rules in the web tier ACL to allow inbound HTTP (80) and HTTPS (443) connections as well as outbound connections to MySQL (3306). We also added a rule in the DB tier ACL to allow inbound MySQL connections.
Note: If you follow this guide step by step and apply this configuration it may fail. That is because Terraform will destroy and then re-create the VM with the proper user data but VMs are not instantly destroyed on cloud.ca when using CloudStack API directly. Instead, they are put in a "destructed" state from which they can be brought back in case the deletion was a mistake. If your configuration fails with Terraform saying a VM with the same name or IP already exists on the network, log in the cloud.ca interface and purge the VM.

When the configuration is applied with terraform apply, access the public IP Terraform gave you and you will be able to start working on your Wordpress configuration!
Our environment is now fully deployed and usable; However, many aspects can be improved. Here are a few suggestions:
- Expose other ports, such as SMTP or anything else that could be required
- Use cloud.ca load balancing capabilities to be able to switch between several instances of Wordpress
- Deploy a MySQL cluster and use load balancing
About the author


