
Getting up and running with container orchestration can be challenging. Luckily, cloud.ca has you covered: we’ve integrated with Rancher to make deploying containers on cloud.ca a snap. By the end of this guide, you’ll have a multi-host container environment running on cloud.ca.
In case you're not familiar, Rancher is an open source container management platform. It works natively with Kubernetes and Docker Swarm, and provides other services like multi-host networking and volume snapshots.
In this guide, you’ll be using the new cloud.ca Rancher integration to create some container hosts, where you’ll deploy some containers.
Getting started
To get going with all of this, you’ll need a cloud.ca account. If you don’t already have an account, you can start your free trial here. After your trial is approved, you’ll receive an email letting you know that your environment is ready.
Now that your cloud.ca account is all set up and you’re logged in, let’s create a Rancher server. Click “Create instance” and create an instance with the following properties:
| Name | rancher |
| Template | Ubuntu 16.04.02 HVM |
| Compute offering | 1vCPU.1GB |
| Port forwarding rule | 80 |
| User data |
#cloud-config apt: sources: docker.list: source: 'deb https://apt.dockerproject.org/repo ubuntu-xenial main' keyid: 5811 8E89 F3A9 1289 7C07 0ADB F762 2157 2C52 609D keyserver: 'hkp://p80.pool.sks-keyservers.net:80' packages: - docker-engine runcmd: - usermod -aG docker cca-user - systemctl start docker - systemctl enable docker - 'docker run -d --name rancher --restart=unless-stopped -p 80:8080 rancher/server' |
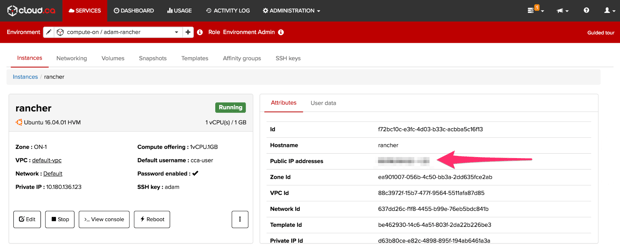
After a few minutes, the new instance will be created with Docker and Rancher installed and running. While you’re waiting for the installation to finish, go to your new instance’s details page and grab the public IP address that was allocated for you - that’s the IP address you’ll be accessing Rancher from for the rest of this guide.
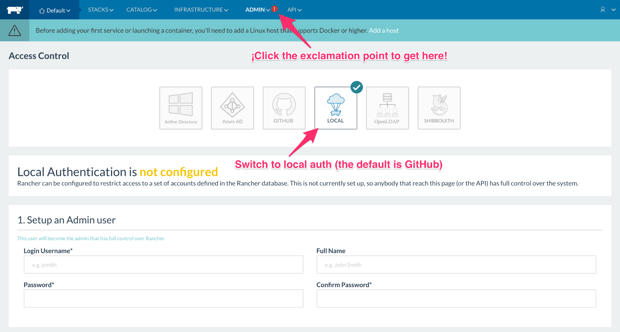
Now that Rancher is up and running, you’ll want to secure your new installation by enabling authentication and creating a new user for yourself. Make sure to not skip this step, as leaving your Rancher unprotected makes it possible for anyone who finds your Rancher installation to consume cloud resources using your API keys.
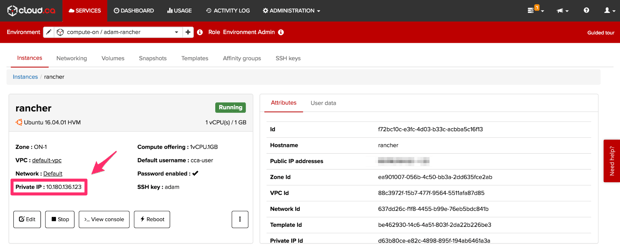
While you’re in Rancher’s settings, you’ll need to configure the Rancher endpoint to be its private IP since we’ll be doing all communication between the Rancher server and the container hosts over their common private network. The private IP of your cloud.ca instance can be found in its details view.
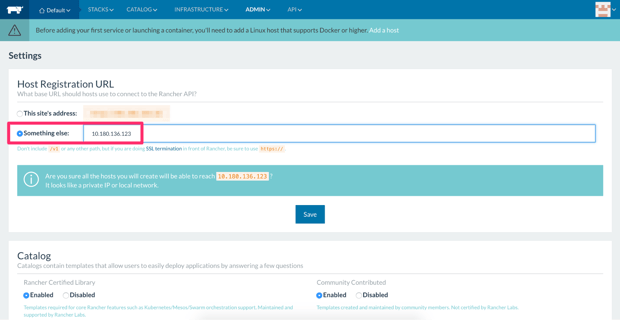
In Rancher, go to Admin > Settings, change the host registration URL to your instance’s private IP and hit save to finish the configuration.
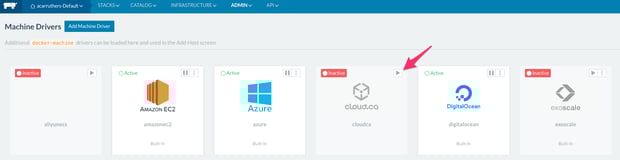
Next, we’ll enable the cloud.ca Docker Machine and Rancher UI drivers in the Admin > Machine Drivers tab. Simply click the play button in the top right-hand corner of the cloud.ca driver.
After the cloud.ca driver is enabled, you should see the option to create a cloud.ca host in the Infrastructure > Hosts > Add hosts screen.
Now that the initial Rancher setup is out of the way, the next step will be to create some container hosts, and after that, the main event: deploying containers!
Creating hosts
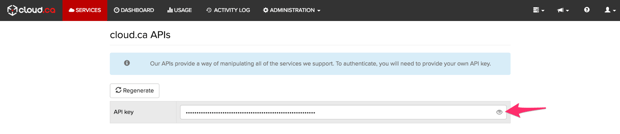
The first thing you’ll need to have to create your cloud.ca instance is your cloud.ca API key, which can be found in the user dropdown in the top right-hand corner of the screen. (While you’re on this screen, it’s worth pointing out that this is where you can regenerate your API keys if you have reason to believe they’ve been compromised in some way.)

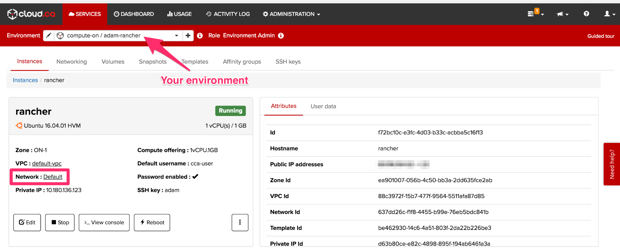
Because your Rancher server is going to communicate over its private network to the hosts, you’re going to need to make sure that the hosts are on the same private network as the Rancher server. To make this happen, select the cloud.ca environment you created your Rancher server in, as well as its network. You can find your environment and network name in cloud.ca from the Rancher server’s instance details page:
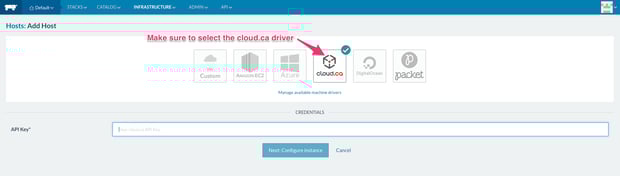
Now back in Rancher you can go to Infrastructure > Hosts and click “Add Host”, select the cloud.ca driver, paste in your API key, and hit “Next: Configure instance” to configure your host(s).
There are quite a few options available to you on the instance configuration page, but for the purposes of this guide, you can use the naming scheme “host01” with the Ubuntu 16 template, the 1vCPU.1GB offering, and 20GB of additional disk space for Docker data. You’ll need need to check “Use Private IP” and use the environment and network name that you got from your Rancher server in cloud.ca so that the hosts use the private network to connect to Rancher.
Lastly, you can pick the number of hosts you’d like to deploy using the Quantity slider.
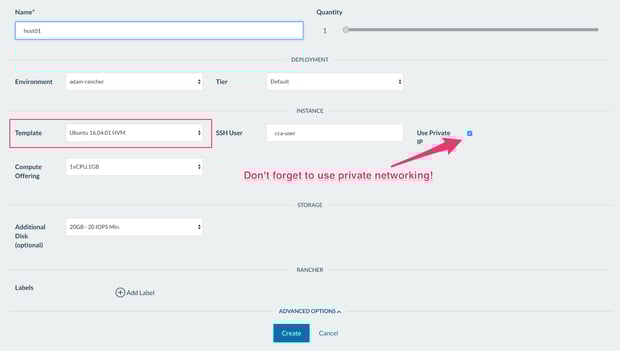
Now hit “Create” and watch Rancher provision your Docker hosts!
Deploying containers
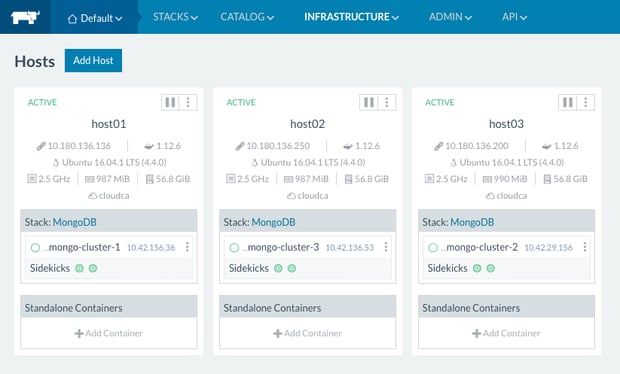
In Docker we work with containers pretty much exclusively. Rancher builds on top of this with services which are groups of containers, and stacks which are groups of services. To see this in action, we’re going to create a 3-node MongoDB cluster through Rancher.
Go to Catalog > All, and then search for MongoDB, and click “View Details”. You can leave all the default fields on the details page and click “Launch” to create and start the MongoDB stack. You can now go back to the Infrastructure > Hosts tab to watch the containers spin up on the hosts you created before. When the containers all turn green, your containerized MongoDB cluster is ready to go!
Next steps
Hungry for more?
- Create a stack from a Docker image you created
- Create a new Rancher environment (Environments > Manage Environments) that uses Mesos or Kubernetes as the orchestrator
- Add a cloud.ca load balancer to forward traffic to containers on your Rancher hosts
- Crank the quantity slider all the way to 11
Visit us at DevOps Days!
If you are in Toronto and attending DevOps Days May 25-26, 2017, come visit the CloudOps/cloud.ca booth and get a demo of our Rancher integration.

