
You’ve run containers locally, so running them remotely is just a matter of SSHing into a machine and running your container there instead, right? What happens when that machine is at capacity? Clearly you need to add another host, but stringing together API calls to create a remote host, install Docker on it, push Docker images to it, and finally run them can be a bit of a hassle.
Enter Docker Machine.
Docker Machine allows you to manage remote Docker hosts while abstracting away the underlying infrastructure and initial setup. By using the cloud.ca Docker Machine driver, creating remote Docker hosts in the Canadian cloud has never been easier.
By following this guide, you’ll install the cloud.ca Docker Machine driver, get a primer on how to use Docker Machine, and finally deploy containers to your Docker hosts.
Getting Started
The first thing you’ll need is a cloud.ca account. If you don’t already have an account, you can start your free trial here. You’ll receive an email after a few minutes letting you know that your environment is ready.
While your cloud.ca environment is being created for you, install Docker and Docker Machine if you don’t already have them on your local machine. Docker for Mac can be found here, Docker for Windows here, and Linux here. For a quick and dirty install, you can simply enter the following in your terminal:
$ curl https://get.docker.com | sh
After Docker is installed, grab the latest release of Docker Machine here.
You should now see something like this:
$ docker -v
Docker version 17.03.0-ce, build 60ccb22
$ docker-machine -v
docker-machine version 0.10.0, build 76ed2a6
Once your Docker machine is set up, you'll need to download the cloud.ca Docker Machine driver. Make sure that it's on your path so that the Docker Machine can find it.
$ which docker-machine-driver-cloudca
/home/adam/bin/docker-machine-driver-cloudca
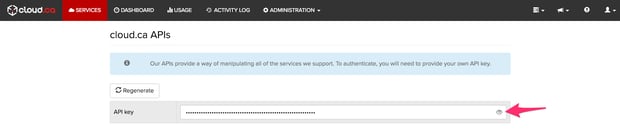
At this point, grab your cloud.ca API key, which will be needed later on to create a remote Docker host. You can find your key by clicking the user dropdown in the top right-hand corner of the cloud.ca console, and selecting API keys. You can view your API key by clicking the eye icon. While you’re on the API keys page, it’s worth pointing out that this is where you can regenerate your API keys if you have reason to believe they’ve been compromised in some way.

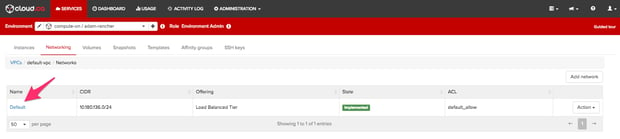
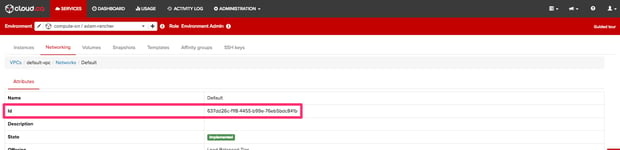
You’re also going to need to know your cloud.ca service code and environment name in order for Docker Machine to know where to deploy hosts, in addition to the ID of a network in the environment you specify.

To keep all this information in one place, I suggest keeping a small script that exports these values as environment variables. You’ll see later on that this will help keep the Docker Machine commands more concise as well. Your file should be called something like ontario_test_area.sh (the environment variable names are important):
#!/bin/bash
export CLOUDCA_API_KEY="******************************"
export CLOUDCA_SERVICE_CODE="compute-on"
export CLOUDCA_ENVIRONMENT_NAME="test_area"
export CLOUDCA_NETWORK_ID="bbefe8dd-bb3e-4f37-b467-b63f8334c15b"
It’s recommended that you keep your API key in a script like the above so that your terminal history and clipboard aren’t carrying around copies of your API key.
Protip: Don’t commit that script and end up being the victim of a GitHub search for "API_KEY”.
Now that you’ve got everything set up, you can start deploying remote Docker hosts!
Creating a Remote Host
In order to create a remote host, you first need to identity its name, the region and environment to create it from, the template to use, and the compute offering (vCPUs, RAM) it should use. For example, a command with the full set of options should look something like this:
$ docker-machine create --driver cloudca \
--cloudca-api-key "******************************" \
--cloudca-service-code "compute-on" \
--cloudca-environment-name "test_area" \
--cloudca-template "Ubuntu 16.04.01 HVM" \
--cloudca-compute-offering "1vCPU.1GB" \
--cloudca-network-id "bbefe8dd-bb3e-4f37-b467-b63f8334c15b" \
--cloudca-additional-disk-offering "50GB - 50 IOPS Min." \
host01
There are quite a few options, but thankfully the cloud.ca driver supports environment variables for all command line options. You can see all the available choices and their associated environment variable names by running docker-machine create -d cloudca.
To clean this up a bit, we can source the script that we created earlier and simplify the creation command to:
$ . ontario_test_area.sh
$ docker-machine create --driver cloudca \
--cloudca-template "Ubuntu 16.04.01 HVM" \
--cloudca-compute-offering "1vCPU.1GB" \
--cloudca-additional-disk-offering "50GB - 50 IOPS Min." \
host01
Running pre-create checks...
Creating machine...
(host01) Acquiring public ip address...
(host01) Creating port forwarding rules...
(host01) Creating port forwarding rule for ssh port ...
(host01) Creating port forwarding rule for docker port ...
Waiting for machine to be running, this may take a few minutes...
(host01) Getting state of the cloud.ca instance...
Detecting operating system of created instance...
Waiting for SSH to be available...
Detecting the provisioner...
Provisioning with ubuntu(systemd)...
Installing Docker...
Copying certs to the local machine directory...
Copying certs to the remote machine...
Setting Docker configuration on the remote daemon...
Checking connection to Docker...
Docker is up and running!
To see how to connect your Docker Client to the Docker Engine running on this virtual machine, run: docker-machine env host01
This way, we only have to specify the template, compute offering, and optional additional disk.
Once the host is created, we can list all available Docker hosts like so:
$ docker-machine ls
NAME ACTIVE DRIVER STATE
host01 - cloudca Running
URL SWARM DOCKER
tcp://xxx.xxx.xxx.xxx:2376 v17.03.0-ce
Deploying Containers on Remote Docker Hosts
Docker Machine has served us well, but it’s time for it to step aside and let plain old Docker do what it does best: deploy containers. We can tell Docker to deploy containers on our remote service by setting it as active like so:
$ eval $(docker-machine env host01)
To make sure our host is active, we can easily check with docker-machine.
$ docker-machine active
host01
Docker is now set up to deploy containers in exactly the same way you’d deploy them locally.
To see this in action, we can deploy a ghost blog on our remote host by running:
$ docker run --name ghost-server -p 8080:2368 -d ghost
To check if the server has started, you can read the docker logs as usual.
$ docker logs -f ghost-server
Pro tip: You can escape the logs by hitting Ctrl+C.
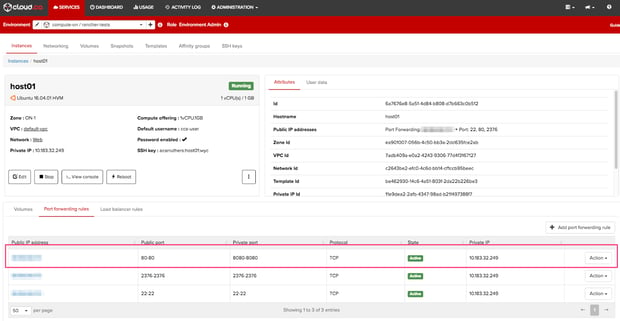
Exposing this container to the public internet will require some networking through cloud.ca. To get you started, go to cloud.ca, click on your docker host, enter its port forwarding rules tab, and create a rule from 80 to 8080.
$ docker-machine ip host01
xxx.xxx.xxx.xxx
Your blog will now be available on the public internet!
After you’re done with your remote docker host and you want to continue deploying containers on your own machine, you can deactivate the host by running:
$ eval (docker-machine env -u)
To verify it was removed:
$ docker-machine active
No active host found
Finally, if you’re done with your remote Docker host, you can remove it with the following:
$ docker-machine rm host01
About to remove host01
WARNING: This action will delete both local reference and remote instance.
Are you sure? (y/n): y
(host01) Releasing public ip address...
Successfully removed host01
Next steps
Now that you know how to deploy containers on remote Docker hosts on cloud.ca, you should try creating multiple hosts, adding load balancing across multiple hosts, and deploying different kinds of containers other than blogs - maybe a MongoDB cluster!
Finally, if you want to orchestrate containers using Docker Swarm, Kubernetes, or Mesos, check out the cloud.ca Rancher plugin. To get started, read our blog post on getting that set up here.

